N2TM – Installing Applications on the Mac
I have seen many friends and acquaintances begin using Macintosh computers over the last five years. Invariably, something that trips up these new converts is how to install and maintain applications on the Mac platform. With the late release of the Mac App Store which gives us a new method of installing and maintaining apps, I thought that I would illustrate the many options for installing Mac applications. In a future post, we will cover different ways to uninstall applications.
Before delving into the different methods for installing applications, I want to first remind you of the method that most Windows users have become accustomed to.
WINDOWS METHODS
1. The Installer
The easiest way to install an application on the Windows side is through the use of an installer program. These programs are executable files that, along with bundles of files, usually decompress many files and put them in various places on your hard drive: the Windows registry, the Program Files Folder, Shortcuts on your desktop and Start menu, etc.
These programs usually are named something familiar such as “Setup.Exe”, “ProgramNameSetup.Exe” or “Install.Exe.” Experienced Windows users can now recognize what installer program icons look like. I have included some samples below.
![]()
![]()
2.Unzip and Install
The next method is similar to the first, but all of the files necessary for installation are compressed together in one package. You must first use and unzipping utility to extract the contents of this archive and then run an installer such as above

On the Windows side, we have become used to letting the installers put files where they need to go on our disk, make changes to our system registry and place shortcut icons for us. The install methods on Mac are quite different.
MAC METHODS
We will outline four different methods for installing applications on your Mac, and help you with when you will need to use each method.
1. The Disk Image

Most software is distributed in the form of disk images. Disk Images may be a new concept to you, but imaging that it is a virtual copy of some disk like a CD, a DVD, a floppy disk or a hard drive. There are three steps in installing an application from a disk image.
I. Mount the disk image
– this is done by double-clicking a disk image file
– images can be auto-mounted if downloaded from a web browser such as Safari
* This is the equivalent of placing a disk inside your computer and it auto-opening
II. Examine the contents of the disk image
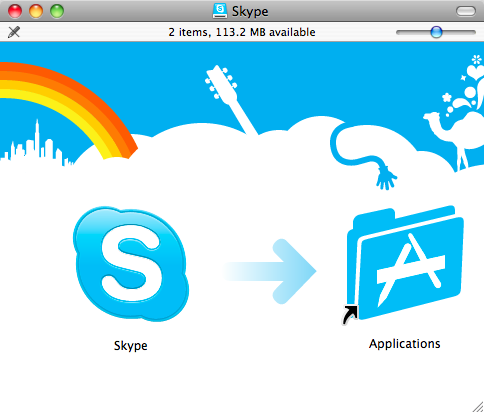
From the image above, we see that this disk image includes and applications bundle (more on this later) called “Skype” and a shortcut to the /Applications folder on your hard drive. You will also notice that the background of this disk image folder has an image that gives you a visual clue on how to install the application. It shows a blue arrow between the Skype application bundle and the shortcut to your /Applications folder.
You may also find that some disk images include installer packages that you need to double click. For the most part, the applications will either visually instruct on what to do or there will be a “README” text document or other text clues that will show you how to install the program
III. Install the Program
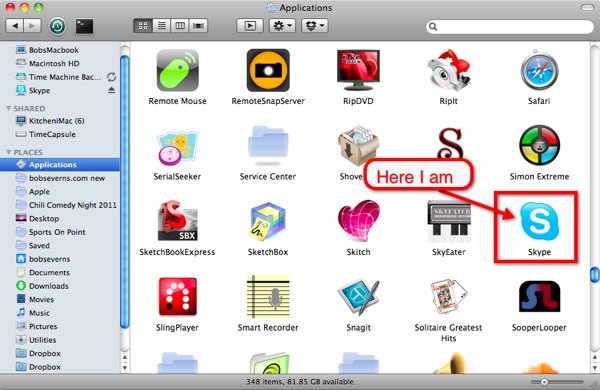
Here, the program is installed by dragging the application bundle (.app) onto the shortcut for the Applications folder. You may be prompted to enter an Administrator user’s password to continue. Once the file is copied, it has now found permanent residence on your hard drive in your /Applications folder.
**POTENTIAL PITFALLS**
Most application bundles will run if you open (double-click) them from the disc image. Since Windows users are used to this action to install programs, you will find that many early Mac users will open the program from the disk image. Not only is the application not installed, but it is possible that it is not saving your preferences properly. If the application is left open, then you will also not be able to unmount the disk image (Step IV below)
IV. Unmount the Disk Image
When your disk image is mounted, you will see an icon that looks like a hard drive on your Mac desktop. The proper cleanup of this file is to unmount it.

There are three methods for un-mounting a disk:
I. Drag the mounted disk image’s icon to the trash can (eject)
II. Press Command-E to eject
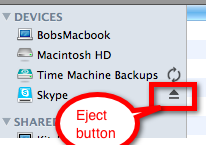
IIi. Click the eject button next to the disk image in the finder
2. The Package Installer
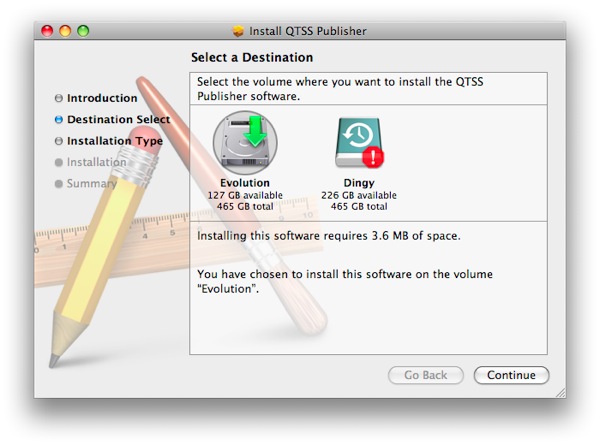
The Installer program usually appears as a little box that is getting unwrapped. The appropriate way to interact with this program is to double-click the installer package and follow the onscreen prompts.

3. Compressed Install Packages
Compressed installers are usually one of the type above but distributed in one of many different file types (.zip files, stuffit exander archives, .rar files, etc.)
To decompress these files, you usually need a decompression utility. Here are some of my favorites.
 The Unarchiver
4. The Mac App Store
The Mac App Store is the newest and probably the easiest way to install applications on your computer. However, since it is very new, there are not many application choices available.
To Install Applications
I. Find the application using the built-in search. the top charts listings, or the categories view.
II. Click the “Buy” or “Free” button in the title bar.
III. The application will fly to your dock and you will be presented with a progress badge overlain on the icon. See our previous App Store post for more details
**Keep in mind that the applications will download to your /Applications folder on your hard drive, and the application’s icon will remain in the dock. To remove the icon from the dock, click and drag upward and it will leave in a poof of smoke.
I hope that this article shed some light on installing applications on your Mac computer. Please leave comments below or email us at will@macconvert.us with your experiences.

